

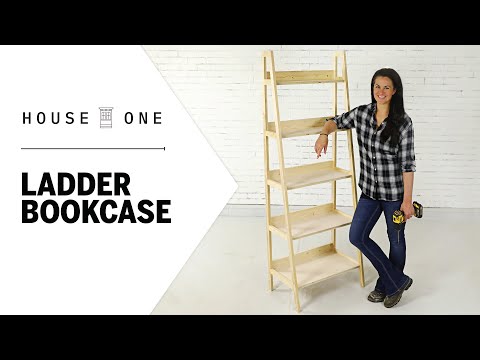
How to Build a Leaning Ladder Bookcase | House One
Looking to add an element of design to your living room or entryway? A leaning ladder bookcase can easily be built for a third of the price you’d pay to buy one at the store. Follow these easy steps to learn how to DIY a ladder shelf.
#ThisOldHouse #AskTOH
SUBSCRIBE to This Old House: http://bit.ly/SubscribeThisOldHouse
Cost: $55
Time: 4 hours
Difficulty: Easy
Tools:
Miter saw [https://amzn.to/3fHRiSt]
Drill driver [https://amzn.to/2UYO6Kd]
Pocket hole jig [https://amzn.to/30S24Bi]
Tape measure [https://amzn.to/3hBVbtM]
Pencil [https://amzn.to/2UYoCfR]
Square [https://amzn.to/2ANjMLC]
Clamps [https://amzn.to/2YMHj7p]
Level [https://amzn.to/2AFplMh]
Circular saw [https://amzn.to/3hHw9tm]
Random orbital sander [https://amzn.to/2Cfaecx]
Clothes iron (optional, to apply edge banding) [https://amzn.to/2NbzPFu]
Shopping List:
(5) 1 x 2 x 8’ boards [https://thd.co/2Z1i6X9]
(2) 1 x 4 x 6’ boards [https://thd.co/2ZNxGrc]
(1) ¾” x 2’ x 4’ plywood project panel [https://thd.co/2NbVwFr]
1 ¼” Pocket hole screws [https://amzn.to/2YR5662]
Wood glue [https://amzn.to/3hFOJlt]
Medium grit sandpaper [https://amzn.to/2Yc509Y]
Fine grit sandpaper [https://amzn.to/37EGcuF]
¾-inch edge banding (optional) [https://thd.co/3eeYfd9]
Paint or stain [https://amzn.to/37Deezo]
Cut List:
• 1 x 2 back leg – 2 @ 70 7/8”
• 1 x 2 front leg – 2 @ 72 (Miter ends at parallel 9 degree angles)
• 1 x 2 top of leg– 2 @ 2 ½” (Miter one end at 9 degrees)
• ¾” plywood shelf – 1 @ 24”W x 14”D
• ¾” plywood shelf – 1 @ 24”W x 11 ¾”D
• ¾” plywood shelf – 1 @ 24”W x 9 ½”D
• ¾” plywood shelf – 1 @ 24”W x 7 ¼”D
• ¾” plywood shelf – 1 @ 24”W x 5 ¼”D
• 1 x 4 supports – 5 @ 24”
• 1 x 2 sides – 2 @ 3 5/8”
• 1 x 2 sides – 2 @ 5 7/8”
• 1 x 2 sides – 2 @ 8”
• 1 x 2 sides – 2 @ 10 ¼”
• 1 x 2 sides – 2 @ 12 ½”
A ladder bookcase is a great addition to any room. Best of all, you can easily build your own for a third of the price you’d pay at the store.
Steps for Building a DIY Leaning Ladder Bookcase
1.Cut the 1 x 2 Parts to Size
2. Prep a Top and Bottom Crosspiece
3. Mark the Height of the Shelves
4. Install the Top and bottom Crosspieces between Two Legs
5. Check that the Side Sets Level
6. Size the Remaining Crosspieces
7. Drill Pocket Holes in the Crosspieces
8. Install the Crosspieces
9. Join the Sides with the 1×4 Boards
With the sides complete, it’s time to join them by attaching 1×4 boards between the sides at the height of each shelf. First cut the 1 x 4 boards to length at 24 inches.
Drill two pilot holes in each end of each board. Apply glue to one end of each board, and then secure it to back leg of the first assembled side—aligned with the shelf heights, and with the pocket holes facing the back.
Once all the boards are attached to the first side, align the boards with the second side of the ladder shelf, and attach them with glue and screws.
10. Size the Plywood Shelves
11. Drill Pocket Holes in the Shelves
12. Attach the Shelves
13. Finish the Front Edge of the Shelves
14. Sand and Finish the Assembly
Follow This Old House and Ask This Old House:
Facebook: http://bit.ly/ThisOldHouseFB
Twitter: http://bit.ly/ThisOldHouseTwitter
http://bit.ly/AskTOHTwitter
Pinterest: http://bit.ly/ThisOldHousePinterest
Instagram: http://bit.ly/ThisOldHouseIG
Tumblr: http://bit.ly/ThisOldHouseTumblr
Keywords:
This Old House, Ask This Old House, DIY, Home Improvement, DIY Ideas, Renovation, Renovation Ideas, How To Fix, How To Install, How To Build
How to Build a Leaning Ladder Bookcase | House One
https://www.youtube.com/user/thisoldhouse/


About The Author
You Might Be Interested In


Comment (0)
LEAVE YOUR COMMENT
You must be logged in to post a comment.
Can we get more of these? I've never seen the clamp going into the pocket hole to align the pieces before, that's a cool trick.
The clamp is made by "Kreg" for their pocket hole system
This was a nice looking project. I built a similar shelf out of plans from a WW magazine, it was WAY to heavy, and some of the shelves didn’t line up well with the back wall. Pretty sure I’d followed the plans accordingly, and I am a 35 year veteran to woodworking, so I don’t think the error was me. I’d like to try this one in the future to replace my current wonky shelf.
Very nice. Clear instructions, to the point. One modification might be to put the supports under the shelves.
Nice video, but most folks aren't going to want to shell out the coin to buy a Kreg pocket hole jig with clamp ($99) . Could do the same build using screws through the sides and plug the holes or use screws with a more decorative head which could be left exposed.
This is just a Kreg ad.
But that's okay because they make some amazing products
What are the lengths between the shelves?
Hi I’m trying to recreate this. At what height do I put each of the cross pieces when I’m making the two sides?
one suggestion, install the edge banding before you install the shelf. This makes it easier to trim off the excess. In most cases, the edge banding is wider than the plywood, so it is necessary to trim it. Whatever method you use to trim it, it is easier if nothing is in the way.
Hmmm… I finally followed Ann's advice and took Woodglut. It's great for beginners and has some advanced stuff too.
Woodglut Blueprints has some very useful blueprints with all the details you need.
I found some amazing plans for Woodglut. Just check them out.
Wow super
I would like to try this project but she doesn't give the spacing for the shelves, which seems difficult to figure out for a beginner.
Unfortunately, the plans they give at the bottom of the video are incorrect. When cutting the shelves, they don't account for the saw blade (usually 1/8"), so you end up with a 5" shelf at the top and not a 5 1/4" shelf. The same is true for the 1×4 supports. If you cut them at 24", you will need an additional 1×4 because the 5th support will be less than 24".
Jenn's channel would be heaps more popular if she worked in a bikini. Enjoyed the video, regardless.
What are the settings on your kreg? My drill bit doesn’t have the stopper like yours so it can go further than necessary. What’s the distance from tip of the bit to the bottom of the stopper? I can tape it then at that length and not ruin it. Thx. This is exactly what I was looking for.
Cant stand how they spend more time on the simple tasks of building it. I dont approve of toh what so ever!
How sturdy is this?
What if you wanted to make this project taller? Like 9' tall? Would that drastically affect anything?
Congratulations, greetings from Colombia
Made this last year for my daughter, looks great. I like the look of this one the best. Thanks