

Bathroom Remodeling Series – Structural Considerations Video 3
1. Old Outdated Electrical and Corroded Plumbing
Doing a bathroom renovation is a great time to deal with old outdated systems. Things like corroded cast iron or galvanized drains and water supply lines.
Even copper water supply lines can be hidden problems if there are corroding joints
2. No Plumbing Vent
Modern plumbing codes have changed the ways plumbers run vent lines for your sink, tub, shower or toilet. Insufficient venting can cause drains to gurgle or traps to be sucked dry, which contributes to drains stopping up.
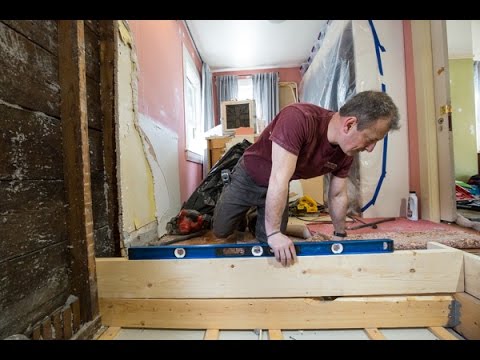
3. Out of Level Floors and Walls
While not always noticeable an out of plumb wall may show itself better when covered with tile and the grout lines taper off.
If you plan on installing shower glass doors and walls like Basco Shower Doors – you want to make your walls as straight and plumb as possible. On tip I use is to install solid surface strips, like granite or Silestone for the glass to butt to.
4. Deficiencies in the Floor Framing
The time to address structural floor issues, like reinforcing floor joists, is at the time it was built or during a retrofit or remodel.
Contractors may cut through floor joists to accommodate plumbing or HVAC mechanical equipment as long as they properly transfer the floor load to adjoining joists by adding headers.
Understanding the different types of basic framing methods will help you to identify load paths in homes built using different framing methods. Being able to locate key point loads will also help you know where to look for structural problems.
Homes are built to transfer the structural load down through the framing to the foundation and soil. This is called the “load path” and it’s where most of the forces in a home are concentrated.
Point loads are loads that are concentrated in a small area, such as where a post supporting a ridge beam rests on a header above a window. Point loads are high-stress areas.
5. Heading Off and Framing Floor Openings:
In a perfect world any floor joist that is cut should have a header installed, preferably two and doubled adjacent joists.
All headers should be nailed to the cut joists and their ends attached to two adjacent, uninterrupted floor joists.
The purpose of the headers are to transfer the floor load to the adjacent trimmer joists.
The use of joist hangers facilitates this repair.
TIP:
A single header nailed to the cut joist and two uninterrupted joists will work for openings less than 4 feet.
If the header spans more than 4 feet, both the header and the trimmer joists should be doubled. We often refer to doubling up of joists or other structural framing as “sistering.”
The doubled trimmer and header joists must be nailed together properly with spaced pairs of 16d nails every 16 inches so that they are reinforcing Floor Joists like beams.
Reinforcing floor joists is best done by doubling of floor joists. Doubling of joists is recommended under walls, heavy objects like tubs and at large openings.
Doubling of joists can solve a lot of problems like sagging, uneven or undersized floor joists.
Sometimes on a remodel you can’t install a full length floor joist because of plumbing, existing walls or finished floors or ceilings.
In these situations it sometimes makes sense to reinforce the floor joist or even all of the floor joists.
6. Reinforcing Joists with Plywood
Reinforcing joists with plywood is effective technique that allows you to add strength to and fix minor problems that are affecting floor joists.
I apply 3/4 inch plywood to both sides of a joist as far needed or I can reach.
I fasten it the joist with construction adhesive and 12-16d nailes spaced every 16-inches on center.
TIP:
In areas where I know the plumber will drill through my joist I will add plywood reinforcing and keep my nails out of the pipe path.
A quality piece of plywood is typically stronger than the corresponding amount of standard wood and is an excellent choice for reinforcing weakened joists and even reducing squeaks.

About The Author
You Might Be Interested In


Comment (0)
LEAVE YOUR COMMENT
You must be logged in to post a comment.
When drilling through floor joists for a bathroom drain (3.5" OD), how long do you recommend for making sister joists for support?
This video inspired a lot of options in my project. Thanks.
My floor joists are 2x6s. I want to run 1.5" pvc through them, but the O.D. of 1.5" pvc exceeds the 1/3rd rule. I think I will run a 2×4 or 2×6 underneath the joists, and then sister with 3/4" plywood on both sides. Then I should be able to run my DWV pipe and fit a P-trap in the floor.
Great information!
Rob, thanks for the advice. You made my remodel much easier. Youre awesome!
Would it be recommended to make an opening where two joist become interrupted?
Great video. Thanks
This is quite frankly hands down the most straight forward and mellow and understandable video I have watched while learning how I am going to repair the nightmare left behind from a slew of insurance sub contractors, do it yourselfers and family friends, lazy builders, a basically the derelict academy. Subfloors are no joke and this saved me. Thank you.
Your rule of thumb for double headers connecting to adjoining joists of less than a 4' span not having to double up the adjoining joist is that only when you're dealing with 12" OC joists versus 16" OC joists?
Hi, thanks for taking the time to post your video and advice. I am from the UK and here we are allowed to drill a hole through the joists a 1/4 of the height of the joists. Can I make it bigger if I sister up with plywood as your hole looks bigger than this. Thanks
Hello Rob, I own a 3 family triple decker style house and I’m remodeling my 3rd floor bathroom. I major gut the bathroom. I noticed one of the joist was cut to install the toilet drain. Through out the years The strain and weight of the concrete sagged where the cut was made. I do not want to move the drain. How can I fix the sagging joist and or reinenforce it. I can send you a picture to show you exactly what’s wrong.’